
How Do You Measure the Offset of a Rim?
How Do You Measure the Offset of a Rim?
Whether you are upgrading to a set of custom forged wheels from ATK Wheels, replacing a damaged factory rim, or trying to achieve that perfect flush stance, understanding wheel fitment is critical. Get it right, and your vehicle handles beautifully while looking aggressive. Get it wrong, and you face ruined tires, damaged fenders, and compromised safety.
One of the most misunderstood aspects of wheel fitment is offset. Many car enthusiasts know they need it, but few know how to calculate it themselves.
If you have ever wondered, “how do you measure the offset of a rim?” you are in the right place. This comprehensive, practical manual breaks down the entire process into simple, actionable steps you can complete right in your garage.
1.Understanding Wheel Offset and Why It Matters
Before grabbing your measuring tape, you must understand exactly what you are measuring.
What is Wheel Offset?
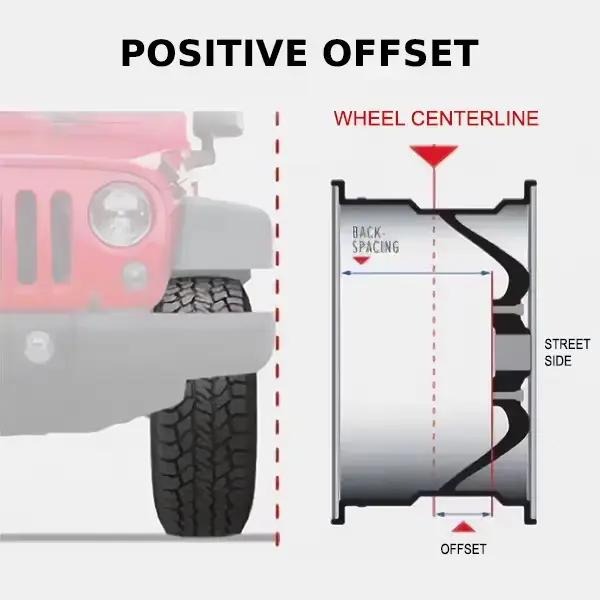
Wheel offset is the distance between the exact centerline of the wheel and the mounting surface where the wheel bolts to the vehicle’s hub. This measurement is always expressed in millimeters (mm).
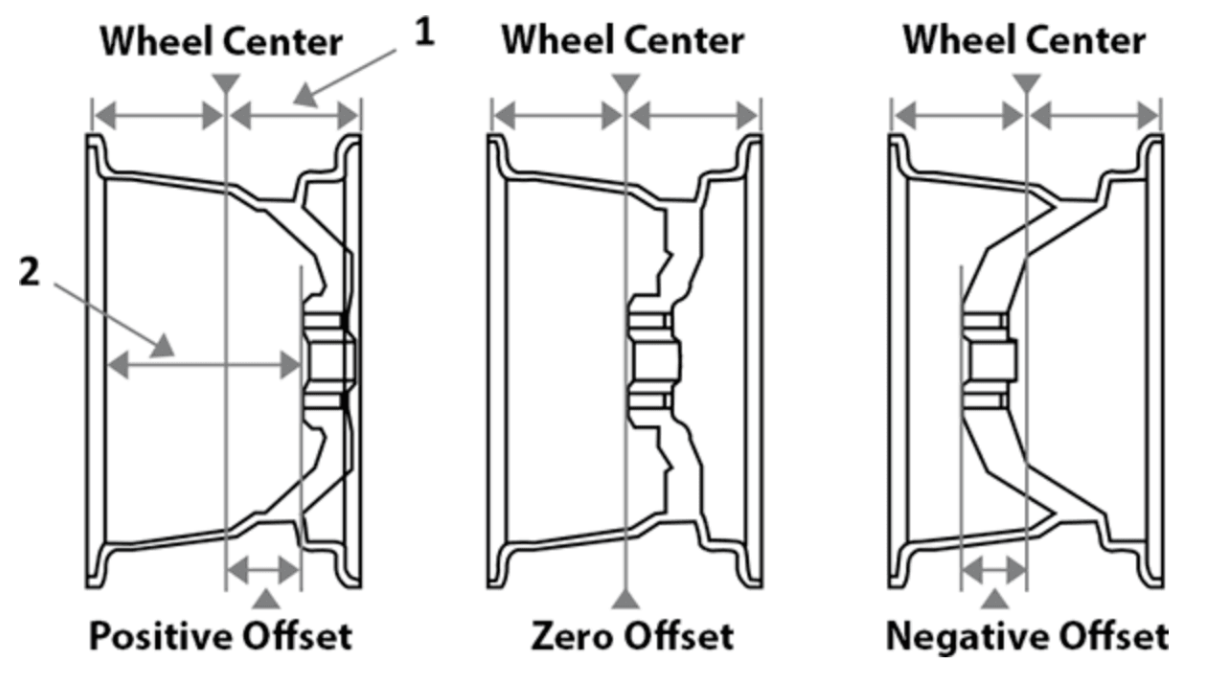
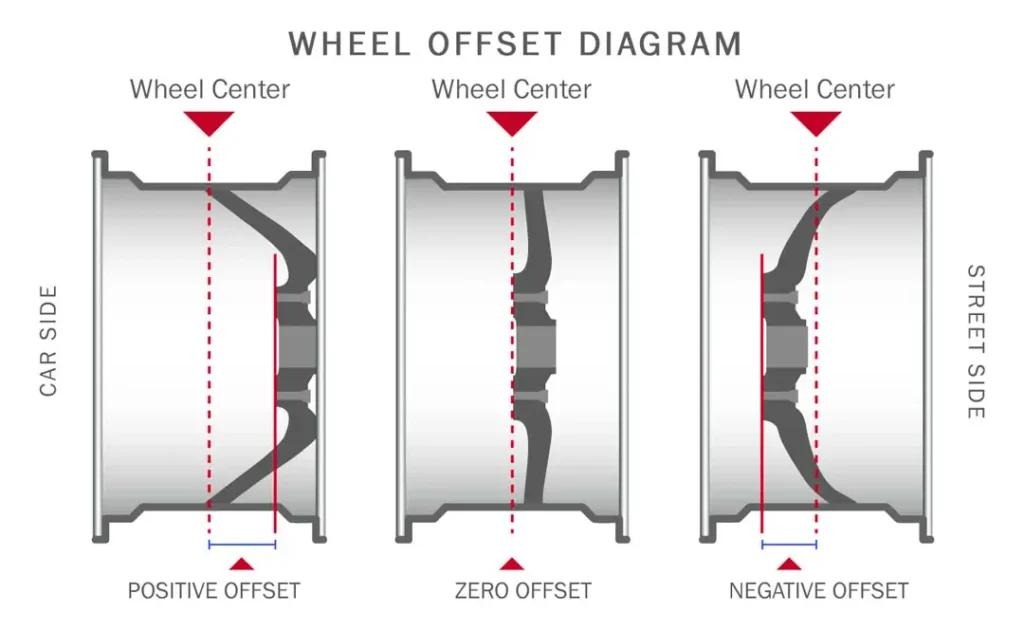
Offset determines how far inward or outward a wheel sits relative to your vehicle’s fender. There are three types of offset configurations:
-
Positive Offset: The hub mounting surface is positioned toward the front (street side) of the wheel’s centerline. This pulls the wheel inward toward the suspension.
-
Zero Offset: The hub mounting surface is perfectly even with the exact centerline of the wheel.
-
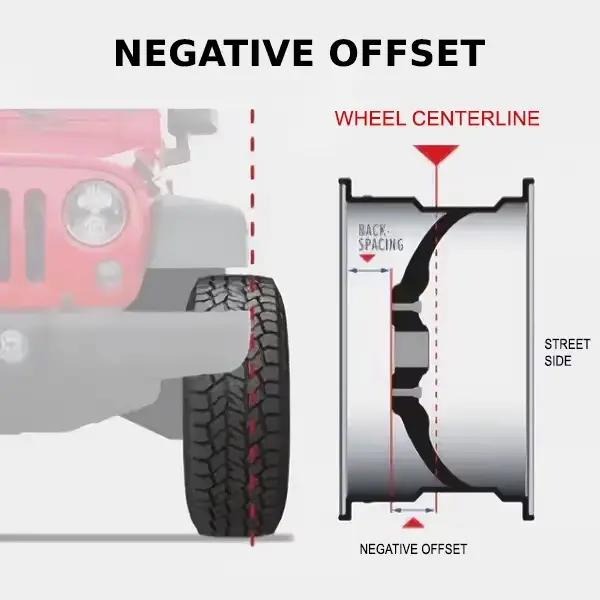
Negative Offset: The hub mounting surface is positioned toward the back (brake side) of the wheel’s centerline. This pushes the wheel outward, creating a deep-dish look.
The Consequences of Incorrect Fitment
Choosing the wrong offset is not just a cosmetic issue; it alters your vehicle’s suspension geometry, scrub radius, and overall handling.
Warning: Installing wheels with too much positive offset can cause the inner lip of the rim or the tire sidewall to rub against your brake calipers, struts, or control arms. Conversely, too much negative offset pushes the tire outward, causing it to slice against the outer fender lip when hitting bumps.
2.Quick Answer: How to Measure the Offset of a Rim
For those looking for a quick summary to get a snapshot of the process, here is the quick answer to achieve a precise measurement:
-
Measure the Total Width: Lay the wheel flat and measure from the outer edge to the inner edge to find the overall width.
-
Calculate the Centerline: Divide the total width by 2.
-
Measure the Backspacing: Place a straightedge across the back edge of the rim and measure the distance down to the hub mounting pad.
-
Subtract Centerline from Backspacing: Subtract the centerline from the backspacing value.
-
Convert to Millimeters: Multiply the final result in inches by 25.4 to get your exact offset in millimeters.
3.Tools Needed for Accurate Measurement
You do not need industrial-grade equipment to measure a wheel. However, accuracy is paramount because offset is calculated in millimeters. A mistake of just a quarter of an inch can cause clearance issues.
Gather the following items before starting:
-
The wheel/rim (fully unmounted from the vehicle; removing the tire yields the most accurate results).
-
A flat, clean workspace (a workbench or a clean piece of cardboard on the garage floor to prevent scratching the wheel face).
-
A reliable measuring tape or a long ruler (ruler with both imperial and metric markings is ideal).
-
A perfectly straight piece of wood, metal, or a straightedge long enough to span the diameter of the wheel.
-
A calculator.
-
A notepad and pen to record your numbers.
4.Step-by-Step Breakdown to Calculate Rim Offset
Follow these physical steps carefully to determine your wheel configuration. For the most precise outcome, complete these steps with the tire removed from the rim.
Step 1: Find the Total Wheel Width
Lay the wheel completely flat on your work surface with the front face (the street side) facing downward.
Place your straightedge across the rear lip of the wheel. Take your measuring tape and measure the total distance from the very bottom edge resting on the ground to the top edge where your straightedge sits.
Note: This “total width” is different from the “advertised width” of a wheel. An advertised 9-inch wheel usually measures around 10 inches from outer edge to outer edge because standard wheel sizing measures the inner tire bead seat, not the exterior flanges.
Let us assume your total measured width is 10 inches.
Step 2: Calculate the Centerline
The centerline is the exact middle point of the rim. To find this, take your total wheel width from Step 1 and divide it by two.

Using our 10-inch example:
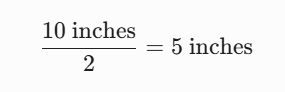
Your baseline centerline for this scenario is 5 inches.
Step 3: Measure the Backspacing
Keep the wheel in the same position (face down). Ensure your straightedge is resting securely across the back lip of the rim.
Insert your measuring tape straight down through the center hole of the wheel until it touches the flat hub mounting surface (the metal pad with the lug holes). Read the measurement where the tape meets the bottom edge of your straightedge. This measurement is your backspacing.
Let us assume your measured backspacing is 6.38 inches.
Step 4: Run the Math Formula
Now you have the two core metrics required to find your answer. Subtract the centerline value (Step 2) from your backspacing measurement (Step 3).

Using our example numbers:
Because the backspacing is larger than the centerline, this is a positive result. If your backspacing was smaller than your centerline, the result would be a negative value.
Step 5: Convert Inches to Millimeters
Since the automotive world standardizes offset in millimeters, you must convert your final number. Multiply your result by 25.4 (since there are 25.4 millimeters in an inch).

Rounding to the nearest whole number gives you an offset of +35mm.
5.Where Is the Offset Stamped on a Rim?
If you want to verify your manual calculations, or if you prefer not to pull out the measuring tape, manufacturers often print this information directly on the product.
The wheel offset is typically stamped or cast on the backside of the wheel structure. To locate it, remove the wheel from your vehicle and inspect the following areas:
-
The flat hub mounting surface between the bolt holes.
-
The back surface of one of the spokes.
-
The inner barrel of the rim (often printed on a manufacturer specification sticker).
Decoding the Stamping
Look for a sequence of numbers containing the letters “ET”. “ET” stems from the German word Einpresstiefe, which translates literally to “insertion depth” or offset.
For example, if you see “18×8.5J ET35”, it decodes as follows:
-
18: The wheel diameter in inches.
-
8.5J: The width of the wheel bead seat in inches and the lip profile type.
-
ET35: An offset of +35mm. If it says ET-12, it signifies a negative 12mm offset.
6.Comparison: Backspacing vs. Offset
While backspacing and offset both measure how a wheel sits within a wheel well, they approach the measurement from different structural points. Understanding how they interact makes ordering custom components seamless.
| Feature | Wheel Offset | Wheel Backspacing |
|---|---|---|
| Measurement Unit | Always calculated in millimeters (mm). | Always calculated in inches (in). |
| Reference Point | Measured from the exact centerline of the wheel. | Measured from the back lip of the wheel. |
| Width Dependency | Independent of width. A +35mm offset stays at +35mm regardless of wheel expansion. | Dependent on width. If a wheel gets wider, the backspacing changes even if the offset stays the same. |
| Common Application | Standard for imports, sport compacts, modern sedans, and European cars. | Standard for classic muscle cars, lifted trucks, and off-road setups. |
7.Common Wheel Offset Mistakes to Avoid
A slight miscalculation can create unexpected mechanical headaches. When inspecting or setting up your stance, watch out for these pitfalls:
-
Measuring with the Tire On: While possible, measuring with a tire mounted introduces room for error. Tires bulge past the rim lip, which skews your straightedge readings. If you must measure with a tire attached, make sure your straightedge rests purely on the metal lip, not the rubber sidewall.
-
Confusing Total Width with Bead Width: Remember that ordering a 9-inch wide wheel means it measures 9 inches inside the bead lips. The physical physical exterior edge-to-edge width will be close to 10 inches. Always use the physical total width for your math calculations.
-
Ignoring Brake Caliper Clearance (X-Factor): Offset tells you where the center disk sits, but it does not account for the shape of the spokes. Deep-dish lips with high positive offsets might still strike large multi-piston sport brake calipers.
-
Assuming One Size Fits All Axles: Many modern rear-wheel-drive platforms use staggered configurations. Never assume your front wheel measurements apply directly to the rear axle.
Signs of an Improper Fitment Setup
If you have recently modified your vehicle configuration and notice any of the following symptoms, your offset may be incorrect:
-
Steering wheel vibration at highway speeds.
-
The vehicle aggressively pulling to one side.
-
Squealing or rubbing noises when executing tight turns or driving over speed bumps.
-
Accelerated, uneven tire tread wear along the inner or outer shoulders.
8.Finding the Best Position for Your Vehicle Type
There is no universal “ideal” measurement for every application. The correct setup depends heavily on your vehicle platform and goals.
1. Passenger Cars & Sedans
Standard daily commuters, luxury vehicles, and family sedans almost exclusively use a high positive configuration (typically +35mm to +55mm). This configuration centers the load directly over the wheel bearings, keeps the tire tucked neatly away from the body panels, and maintains factory suspension predictability.
2. Stock or Leveled Light Trucks
For a truck with factory suspension or a mild front leveling kit, offsets ranging between 0mm and +18mm offer an excellent balance. This pushes the assembly out slightly, filling out the factory flares without requiring aggressive trimming of the plastic inner liners.
3. Lifted Off-Road Rigs
When building dedicated trail rigs or lifted trucks, drivers favor deep negative setups (ranging from 0mm down to -44mm). This creates a wide, muscular stance that stabilizes high center-of-gravity trucks while accommodating massive mud-terrain tires. However, installing these setups often requires minor trimming of inner bumper plastic to prevent rubbing on full lock turns.
Frequently Asked Questions(FAQ)
1.What does a +35 offset mean on rims?
A +35 offset means the wheel’s mounting surface is positioned exactly 35 millimeters outward (toward the street face) from the precise centerline of the wheel. This is a common setup for front-wheel-drive and modern all-wheel-drive passenger platforms, pulling the assembly slightly inward to sit flush with or inside the fender line.
2.Can I change my offset without buying new wheels?
Yes, within a certain limit. If you need to decrease your offset (push the wheels further out), you can install high-quality, hub-centric wheel spacers. For example, adding a 5mm spacer to a +45mm wheel effectively changes the position to +40mm. However, you cannot increase your offset (pull the wheels inward) without machining material off the mounting pad, which is generally unsafe and not advised.
3.Does changing the wheel position void my factory warranty?
Modifying your wheel configuration does not automatically void your entire vehicle warranty in the United States due to the Magnuson-Moss Warranty Act. However, if a dealership can prove that an extreme aftermarket offset caused premature wheel bearing failure or suspension component wear, repairs for those specific items can legally be denied.
4.What is the difference between positive and negative configurations?
A positive configuration places the hub surface toward the outside face of the rim, keeping the wheel assembly tucked into the bodywork. A negative configuration places the hub surface deep inside toward the brake assembly, forcing the outer rim barrel to project outward, which creates a wide stance and deep outer lip.
Secure Your Next Set of Wheels with Confidence
Determining your wheel measurements does not have to be a guessing game. By applying these foundational measurements, you can browse any aftermarket wheel catalog with absolute confidence, knowing exactly how a new set will sit on your vehicle.
Are you ready to transform your vehicle’s aesthetic and handling performance? Explore the premium lineup at ATK Wheels. From sleek, street-optimized styles to aggressive, rugged off-road options, we craft premium wheels designed to fit your application flawlessly. Visit our online gallery or contact our fitment specialists today to discover the ideal design for your next project!