How to Remove a Center Cap Without Damaging Your Wheels
How to Remove a Center Cap Without Damaging Your Wheels
Upgrading your wheels, swapping custom logos, or replacing a faded emblem often starts with one
simple step: removing the wheel center cap. While it might look like a tiny plastic or aluminum
disc sitting in the middle of your rim, taking it off incorrectly can lead to scratched paint,
bent retention clips, or cracked hub covers.
Whether you need to know how to remove a center cap without removing the wheel or you are dealing with stubborn dirt and rust on an older vehicle, using the proper technique ensures your rims stay pristine. In this comprehensive walk-through, you will learn the exact steps to detach any hub cover quickly, safely, and efficiently.
1.Understanding Your Center Cap Type Before You Start
Not all wheel center caps attach to the rim in the same manner. Attempting to pry off a bolt-on cover from the front will snap plastic tabs and permanently damage your wheel finish. Before grabbing any tools, identify which category your center cap falls under.
1. Snap-On (Clip-On) Center Caps
Snap-on center caps are the most common style found on factory OEM rims and standard aftermarket wheels. They feature flexible plastic or metal retention clips—often reinforced by a thin circular metal tension spring—that slide directly into the center bore of the wheel.
-
Primary Removal Method: Can be popped out from the front using specialized tools, tape, or suction cups, or pushed out easily from behind the rim.
-
Common On: Ford, Chevrolet, Toyota, Honda, BMW, and most custom aftermarket wheel brands.
2. Screw-On and Bolt-On Center Caps
Screw-on designs are widely used on deep-dish truck rims, off-road wheels, and high-end modular custom wheels. Instead of relying purely on tension clips, these caps are held securely in place by small hex bolts, Allen screws, or plastic lug covers.
-
Primary Removal Method: Requires removing the mounting fasteners from the front before the main cap can detach.
-
Common On: Method Race Wheels, Fuel Off-Road, Ultra Wheel, and classic multi-piece custom rims.
3. Push-Through Center Caps
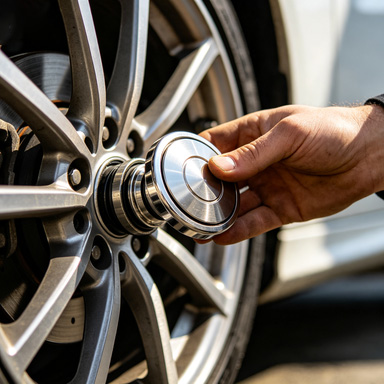
Push-through caps are tall, cylindrical chrome or steel caps typically seen on trucks, trailers, and older rear-wheel-drive vehicles. These caps feature a widened flange at the base that sits behind the wheel center bore.
-
Primary Removal Method: Must be pushed out from the rear face of the wheel. They cannot be removed from the outside while the wheel is mounted on the vehicle.
-
Common On: Dually trucks, steel trailer wheels, trailer hubs, and vintage classic cars.
2.Comparison Table: Removal Techniques & Tool Requirements
The table below breaks down the primary center cap categories, how they fasten to the rim, the safest removal technique, and whether wheel unmounting is necessary.
| Center Cap Style | Attachment Mechanism | Best Outside Removal Technique | Requires Removing Wheel? | Risk of Wheel Scratching |
|---|---|---|---|---|
| Snap-On / Clip-On | Plastic or metal spring clips | Duct tape pull, suction cup, or nylon pry tool | Optional (Easier with wheel on) | Low to Medium (if using unprotected metal tools) |
| Screw-On / Bolt-On | Hex screws or Allen bolts | Allen key or screwdriver removal of fasteners | No | Very Low |
| Push-Through | Flanged base behind center bore | Push out firmly from back face | Yes (Mandatory) | None |
| Threaded Center Nut | Large central thread into hub | Specialized hex wrench or cap tool | No | Low |
3.Method 1: Removing Snap-On Center Caps Without Removing the Wheel
If you want to save time and avoid jacking up your vehicle, you can remove most clip-on center caps directly from the outside. Here are the three most effective, scratch-free techniques.
Option A: The Heavy-Duty Duct Tape Pull Technique
This is one of the safest and quickest DIY tricks because zero hard tools ever touch your clear coat or wheel finish.
-
Clean the Surface: Thoroughly wipe off brake dust, road dirt, and wax from the face of the center cap using isopropyl alcohol or quick detailer spray. Dry it completely.
-
Apply the Tape: Cut a 10 to 12-inch strip of high-tack duct tape or Gorilla tape.
-
Form a Pull Handle: Press the middle 3 to 4 inches of the tape firmly onto the center of the cap. Fold the two loose ends together to form a sturdy T-shaped handle sticking straight out.
-
Pull Firmly: Hold the handle with both hands and pull straight outward with a quick, assertive yank. The suction and adhesive grip will pop the cap right off the tension clips.
Option B: The Suction Cup Method
Heavy-duty glass suction cups or dent-puller suction cups offer incredible leverage on smooth, flat, or painted center caps.
-
Wash and dry the center cap surface.
-
Press the suction cup firmly against the middle of the cap until a tight seal is formed.
-
Lock the suction lever (if using a dent puller cup).
-
Pull straight out toward you until the cap disengages from the wheel center bore.
Option C: Using Plastic Trim Removal Tools
When duct tape or suction cups fail to generate enough force—especially on tight-fitting factory center caps—use nylon auto-trim prying tools.
-
Inspect the circumference of the cap for a small factory notch or gap.
-
Slide the thin edge of a nylon plastic pry tool into the gap between the cap edge and the wheel bore.
-
Apply light levering pressure while supporting the cap with your fingers so it does not fly off and hit the pavement.
-
Work around the perimeter, prying slightly at 12 o’clock, 6 o’clock, 3 o’clock, and 9 o’clock until the clip tension releases evenly.
4.Method 2: The Safest Technique (Pushing Out From Behind)
When working with expensive custom wheels, forged aluminum rims, or painted finishes, the absolute safest way to remove a wheel center cap is from behind the wheel. This completely eliminates any risk of scratching the front face of your rim.
Step 1: Secure the Vehicle and Loosen Lug Nuts
Park your vehicle on a flat, level concrete surface and engage the parking brake. Place wheel chocks behind the tires that will remain on the ground. Using a breaker bar and the correct socket size, loosen the lug nuts on the target wheel by one half-turn while the tire is still touching the ground.
Step 2: Elevate and Support the Car
Position a hydraulic floor jack under the manufacturer-recommended jacking point on the frame or pinch weld. Lift the vehicle until the tire clears the ground by an inch or two. Slide a heavy-duty jack stand beneath the vehicle frame for safety—never rely solely on a hydraulic jack when working on a car.
Step 3: Remove the Wheel
Unscrew the lug nuts completely, set them aside in a clean tray, and carefully pull the wheel straight off the wheel studs. Lay the wheel face down on a soft blanket, foam pad, or clean piece of cardboard to shield the custom wheel face from gravel and scratches.
Step 4: Push the Cap Out
Look at the rear hub cavity on the back of the wheel. You will see the back side of the center cap exposed.
-
Hand Pressure: Press firmly on the back of the cap using both thumbs.
-
Rubber Mallet Handle: If the fit is snug, take the wooden or rubber handle of a mallet (or the wooden end of a hammer), place it against the back of the cap, and tap the head of the mallet gently with your hand. The center cap will pop out smoothly from the front face.
5.Method 3: How to Remove Screw-On and Bolt-On Center Caps
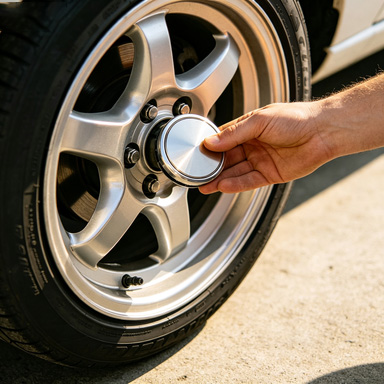
Off-road truck wheels, deep-lip rims, and multi-piece modular wheels frequently feature bolt-on cap assemblies. Attempting to pry these caps off will crack the plastic housing or strip the mounting threads.
Step 1: Identify the Fastener Head
Inspect the perimeter of the center cap for small hardware. Custom truck wheels typically use hex-socket screws, Torx-head bolts, or small Phillips screws. On some designs, only two or three of the bolts are functional while the rest are decorative plastic rivets.
Step 2: Select the Exact Tool Bit
Using the wrong size metric or imperial Allen key will round out the screw head. Match the hex key or Torx bit precisely to the bolt head. Clean out any packed dirt or mud inside the screw sockets using a pick or wire brush before inserting your tool.
Step 3: Back Out the Screws
Turn the screws counterclockwise to remove them. Keep track of the small washers or rubber O-rings attached to each screw, as these prevent moisture intrusion into your wheel hub.
Step 4: Lift the Cap Straight Off
Once all securing bolts are removed, the cap will slide directly off the front face of the wheel.
6.Troubleshooting Stuck, Rusted, or Frozen Center Caps
Over time, road salt, corrosive brake dust, moisture, and road grime collect around the aluminum wheel bore. This causes galvanic corrosion between metal tension clips and the wheel alloy, effectively gluing the center cap in place.
If your wheel center cap refuses to budge, follow these steps to free it without causing damage:
1. Dissolve Dirt and Road Grime
Spray a generous amount of automotive wheel cleaner or a 50/50 mix of warm water and dish soap around the seam of the center cap. Use a soft-bristle detail brush to agitate the gap and work out trapped sand and grit. Rinse thoroughly with clean water and blow dry with compressed air.
2. Apply Penetrating Lubricant
Spray a small amount of penetrating fluid (such as WD-40, PB Blaster, or Liquid Wrench) directly into the perimeter seam where the cap meets the center bore. Allow the lubricant to soak into the clips for 5 to 10 minutes to break down oxidation and rust buildup.
3. Thermal Expansion
If metal clips are frozen due to cold winter weather, use a household hair dryer on medium heat to gently warm the wheel bore area around the cap. Aluminum expands slightly faster than plastic clips, expanding the tolerance and freeing stuck caps. Never use an open flame or high-temp heat gun on painted or clear-coated wheels.
4. Controlled Vibrational Taps
Take a rubber mallet and gently tap the outer face of the wheel tire sidewall or tap softly around the perimeter of the cap itself. The subtle vibration helps break the bond formed by corrosion without cracking brittle plastic.
7.Essential Safety Precautions and Paint Protection Tips
Protecting the aesthetic appeal of your custom wheels requires caution and the right technique. Keep these professional tips in mind whenever servicing hub caps:
-
Tape Your Tools: If you must use a flathead screwdriver or metal trim removal tool, wrap the tip with three layers of electrical tape, masking tape, or heavy painter’s tape. Alternatively, lay a microfiber cloth or rag over the wheel surface as a protective buffer before levering.
-
Inspect Retention Clips: Prior to reinstalling any center cap, inspect the plastic tabs and circular wire expander spring on the back. If a clip is bent or cracked, replace the cap immediately to prevent it from flying off on the highway.
-
Apply Anti-Seize or Silicone Grease: When installing replacement center caps, apply a micro-thin layer of dielectric grease or marine-grade anti-seize around the inside lip of the wheel center bore. This shields against future oxidation and makes next season’s removal effortless.
-
Mind Temperature Sensitivity: Plastic clips become brittle in freezing temperatures. Perform center cap maintenance in a heated garage or warm up the plastic with warm air before applying prying pressure to prevent clip breakage.
8.Choosing the Right Replacement Center Cap for Your Wheels
Removing your old center caps is often the first step toward refreshing your vehicle’s stance or installing new aftermarket wheels. When shopping for replacement caps, getting exact dimensions is crucial for proper fitment.
-
Outer Diameter (OD): Measure the widest point across the front face of the center cap.
-
Inner Clip Diameter (ID): Measure the distance across the outside edge of the clip tabs at the back of the cap.
-
Bore Depth: Ensure the cap stem depth provides adequate clearance for your axle nut and hub assembly, especially on front-wheel-drive cars and 4WD trucks with protruding hubs.
High-quality aftermarket wheel brands—such as ATK Wheels—engineer center bores to exact tolerances for hub-centric fitment, offering clean, secure cap snaps that hold firm even under intense road vibrations and high braking heat.
Frequently Asked Questions (FAQ)
Q1: How to remove a center cap without removing the wheel?
You can remove clip-on center caps directly from the outside face using high-tack duct tape (formed into a pull handle and yanked firmly), a heavy-duty suction cup, or a nylon plastic trim tool. Always avoid unprotected metal tools to safeguard your wheel paint.
Q2: What is the safest way to remove a wheel center cap?
The safest method overall is removing the wheel from the vehicle and pushing the cap outward from the back of the center bore using your thumb pressure or the wooden handle of a rubber mallet. If working from the front side, wrap all tools in masking tape or use non-marring nylon tools.
Q3: Why won’t my wheel center cap come off, and how do I fix it?
Center caps usually get stuck due to accumulated dirt, corrosion, or brake dust cementing the retention clips to the wheel bore. Clean around the edges with wheel cleaner, apply penetrating oil like WD-40, let it sit for 5–10 minutes, and gently tap around the perimeter before prying.
Q4: Do all wheel center caps pop off the same way?
No. There are three primary attachment styles:
-
Snap-On: Pops out from the front using suction, tape, or plastic pry tools.
-
Screw-On / Bolt-On: Fastened with small screws or Allen bolts; requires unfastening hardware first.
-
Push-Through: Features a rear flange and can only be removed from behind the unmounted wheel.
Q5: Can I use a screwdriver to remove a center cap?
Yes, but you must proceed with extreme caution. Wrap the tip of a flathead screwdriver completely with electrical or painter’s tape to prevent gouging the wheel’s clear coat, or place a thick rag between the screwdriver and the rim.
Upgrade Your Ride with Premium Wheels and Fitments
Removing your center cap is a quick maintenance task that can dramatically transform your vehicle’s look when done right. Whether you are replacing damaged hub covers, servicing your wheel bearings, or prepping your car for a fresh set of custom rims, using proper techniques protects your investment.
Looking for high-performance aftermarket wheels, precision fitments, or stylish replacement center caps? Explore the premium selection at ATK Wheels to find aggressive offsets, stylish finishes, and durable wheel designs built for car enthusiasts and daily drivers alike!